Showing posts with label Beauty. Show all posts

Sunday, 29 January 2017

Special Occasion Duos | Perfect Nail Polish and Lipstick Duos

Special Occasion Duos | Perfect Nail Polish and Lipstick Duos 


Hey,

Hope all is well,


Today I thought I would share two of my favourite nail polish and lipstick duos with all lovely people.

Previously I purchased two Technic nail polishes for the very affordable price of 99p in the colours of 'Morello' and 'Seashell'. And when I got home, I realised that they go perfectly with two of my favourite lip sticks: Maybelline Long Lashing Lipsticks in 'Drop of Sherry' and Kate Moss' nudes collection in 'Rock 'n' Roll Nude'.


These duos are perfect for any special occasion out, be it a day out or for a party. The duos are also perfect for a dance show, especially with the bright pigments that some duos have, meaning you can be seen for miles from the stage by the audience; a very important thing in performance to remember.

The best thing about these duos, is that the lipstick has strong pigments that match the strong pigments of the nail polishes. The Technic polishes are great, because for an affordable nail polish, they're consistency is very good and they last for a long time without chipping and coming off; even for someone like myself who is always busy at work picking up products and serving customers and writing non stop at college.
    The lipsticks are an absolute favourite of mine. I adore their pigments and they have a lovely cream-like consistency to them, meaning they can be applied evenly and leave your lips looking smooth and you looking gorgeous.

One duo that I love is the grouping of Maybelline Long Lasting Lipstick in 'Drop of Sherry' and Technic Nail Polish in 'Morello'. These two beauty products seem to compliment each other completely, and I call this duo 'Very Berry'. Their pigments are a dark red berry colour, one of my most favourite colours recently that I cannot get enough of. This duo is perfect for a special occasion, or even just every day, as they add a pop of colour to your look that's neither too bright or too pale but is perfect to give a little extra to your look. This duo is my most used beauty duo at the moment.


My second duo that are ideal for any occasion, especially later in the year with spring and summer, is the combination of Maybelline Long Lasting Lipstick in 'Rock 'n' Roll Nude' and Technic Nail Polish in 'Seashell'. The metallic pigments in the nail polish compliments the nude pink undertones and pigments in the lipstick, giving off a shimmery, pinkish look; perfect to convey a elegant feel to your look. This duo is also used often by me when, especially during every day because the paler colours are more subtle but still intense in their pink pigments. I have named this duo 'Pearl Pink' for their lovely pink tones that convey a subtle feeling of elegance.


There you go, my nail polish and lipstick two beauty duos that are perfect for any occasion.


Thank you for reading,

Yours truly,
Caris


Tuesday, 27 December 2016

Perfect Smokey Eye | Frosted Rose Eye Shadow

Perfect Smokey Eye | Frosted Rose Eye Shadow


Hey,

Hope all is well,

I previously posted this on my other blog, Caris' Blog, and thought why not post it here for a makeup idea for dance shows, such as ballet shows for a perfect dance show makeup look. Enjoy :) 

Final look of 'Frosted Rose' eye shadow look using 
'Technic Bronzing Eyeshadows Baked
Eyeshadow ' palette and Rimmel Long Lasting
Lipstick in 'Rock 'n' Roll Nude' by Kate Moss.
I love eye shadow, especially baked eye shadow, and I love the smokey eye look. My every day look always involves a smokey eye. Ever since discovering makeup when I was around 13/14, I have forever loved the look of a smokey eye. I just love how pretty the colours look, blending into other complimentary colours, and that you can wear it for any occasion and it just looks great. 
   So I have decided to share my new favourite eye shadow palette that I recently purchased, my Technic Bronzing Eyeshadows Baked Eyeshadow palette in what I call 'Frosted Rose', and my Frosted Rose Smokey Eye look I created using this palette.

Now before I start, I just want to tell you all about this palette, because its my new love. Some of you may be thinking 'Technic? That's not a big brand is it?' and that's a common thought with makeup brands that aren't as popular as the makeup giants like Rimmel or Max-Factor, Mac or Maybelline.
My 'Frosted Rose' eye shadow look using my
'Technic Bronzing Eyeshadows Baked
Eyeshadow ' palette.
   I purchased this palette for £2,99 and I love it; it has all the pigmentation I have been searching for and is so cost effective. Not only is it gorgeous with it's pinkish hue, but a great price. To add, Technic are also against animal testing unlike other brands such as Maybelline and Rimmel, which may come as an unexpected shock to some, due to the ideology that 'cheap', cost-effective makeup is of low quality and therefore of bad morals, but in this case that belief is banished. This puts this palette in my good books, because this palette even more worth it's cost, as the majority of non-animal testing brands can be fairly expensive to purchase and don't last very long when I use them as frequently as I do.

So let me tell you about the Frosted Rose Smokey Eye look I created one day using my new 'Technic Bronzing Eyeshadows Baked Eyeshadow' palette.


1) To start with, I firstly applied my every day makeup: foundation, concealer and press powder. I then took my trusty eye shadow brush and applied the base shadow to my eyelid, the lightest colour in 'Frosted Snow', dabbing it lightly on to my eyelid, building up the intensity of the pigment due to it's very light pale white-pinkish hue.

Makeup for this look:'Technic Bronzing Eyeshadows Baked
Eyeshadow' palette in 'Frosted Gold, and Rimmel Long Lasting
Lipstick in 'Rock 'n' Roll Nude' by Kate Moss.
In order of left to right: Top: 'Truffle', 'Frost', 'Rusted Gold'
Bottom left to right: 'Ice', 'Berry', 'Copper Bronze'.
2) I then placed a darker shade of shadow in  'Rusted Gold' onto the tip of the brush, and started to blend it into the crease of my eyelid to create the smokey look and highlight my eyes. I worked along starting at the lash line, and then along the crease on top of my eyelid, and repeat. I continue to add and blend small amounts, slowly building up the intensity of the eye shadow and creating the slightly pinkish tone of the eyeshadows. After adding enough shadow, I then used the brush without any eye shadow on it, to blend the shadow into the base shadow to stop a harsh clash of unblended eye shadow. I will admit that for some like myself when first starting smokey eye looks, it takes practice to learn blending and what way to blend the shadow into the crease of the eye depending on your eye shape. When blending the shadow, I do mine in an almost 'V' on it's side like this: ' < ' shape, with the point being the outer corner of my eyelid, instead of a 'C' shape, as my eyelids are too big for the 'C' shape route to take as you blend.

3) Lastly, to achieve the shadowed effect the smokey eye creates and add depth to the eye, I applied 'Truffle' a tiny bit onto the brush and gently dabbed it above the lash line and then along the outer corner's crease of my eye; the areas of the eyelid that my 'V' shaped route to blend the shadow would take. I always prefer to apply the darkest colour such as 'Truffle' lightly at first, as if it's too dark it can be difficult to blend without looking like a panda. Finally to finish off, I very very lightly moved the brush back and forth in the 'V' route to lightly blend the darkest shadow, with strokes literally of about 2mm or approximately 1cm. As always, I get my un powdered powder brush and gently flicked the brush outward along my skin under my eyes, to rid of excess powder that falls onto the eye lashes and under eyes when it's applied. Just staring from the outer corner and flicking it outwards flicks the shadow off your face.
The final look for my Smokey eye 'Frosted Rose' look.
Because I am looking down, you can see the blending of
eye shadow to create the smokey eye look.
   A trick I use when applying eye shadow, is to gently tap the eye shadow brush on the edge of the palette case to remove excess, loose shadow that will fall under my eyes when being applied.

4) To complete the look, I apply my mascara. Working my way from outer lashes and underneath the lashes, I firstly apply it gently to the top of the lashes, and then the bottom, to fully coat the eyelashes by hiding any loose eye shadow residue which will be settled on my eye lashes, and to help them keep their shape. I do this as my eyelashes are quite long and taper downwards in a curve leaving lashes that flick outwards like a cat eye liner would.

To add, another useful tip I have for eye shadow application when you've applied shadow for the smokey eye look, is how to deal with bits of mascara ending up on your eyelids which are covered in layers of perfected eye shadow. What I do is get my eye shadow brush and make it clean of any residue by rubbing it on my hand so that the residue won't transfer, and then lightly move the brush back and forth on the eye lid in small strokes to gently blend and remove the black mascara, yet without removing any of the shadow or disturbing the balance of pigmentation of eye shadow.

5) To compliment my pinkish 'Frosted Rose' smokey eye look, I pair this look with my favourite lipstick: Rimmel's Lasting Finish Lipstick in 'Rock 'n' Roll Nude' by Kate Moss in her nudes lipstick collection. I feel this
lipstick compliments the pigmentation of the eye shadow and the 'Frosted Rose' smoky eye look with it's nude pink pigments.


The final look complete with 'Technic Bronzing
EyeshadowsBaked Eyeshadow' palette and
 Rimmel Long Lasting Lipstick
in 'Rock 'n' Roll Nude' by
Kate Moss; to create a pinkish
nude, frosted rose look.
Close up of the look. This 'Frosted
Rose' look is subtly but an effective
smokey eye look. 
I hope my quick tutorial was interesting, helpful, and maybe even inspiring to read for new makeup looks, and I hope you enjoyed the post. This smokey-eye eye shadow look was just created one morning when I was getting ready for college and decided to use my new 'Techic Bronzing Eyeshadows Baked Eyeshadow' palette, and I really liked the results I achieved just by experimenting with makeup.

Thank you for reading,

Yours truly,
Caris


Tuesday, 29 November 2016

Ultimate Make Up Crush | Baked Eye Shadow

Ultimate Make Up Crush | Baked Eye Shadow 

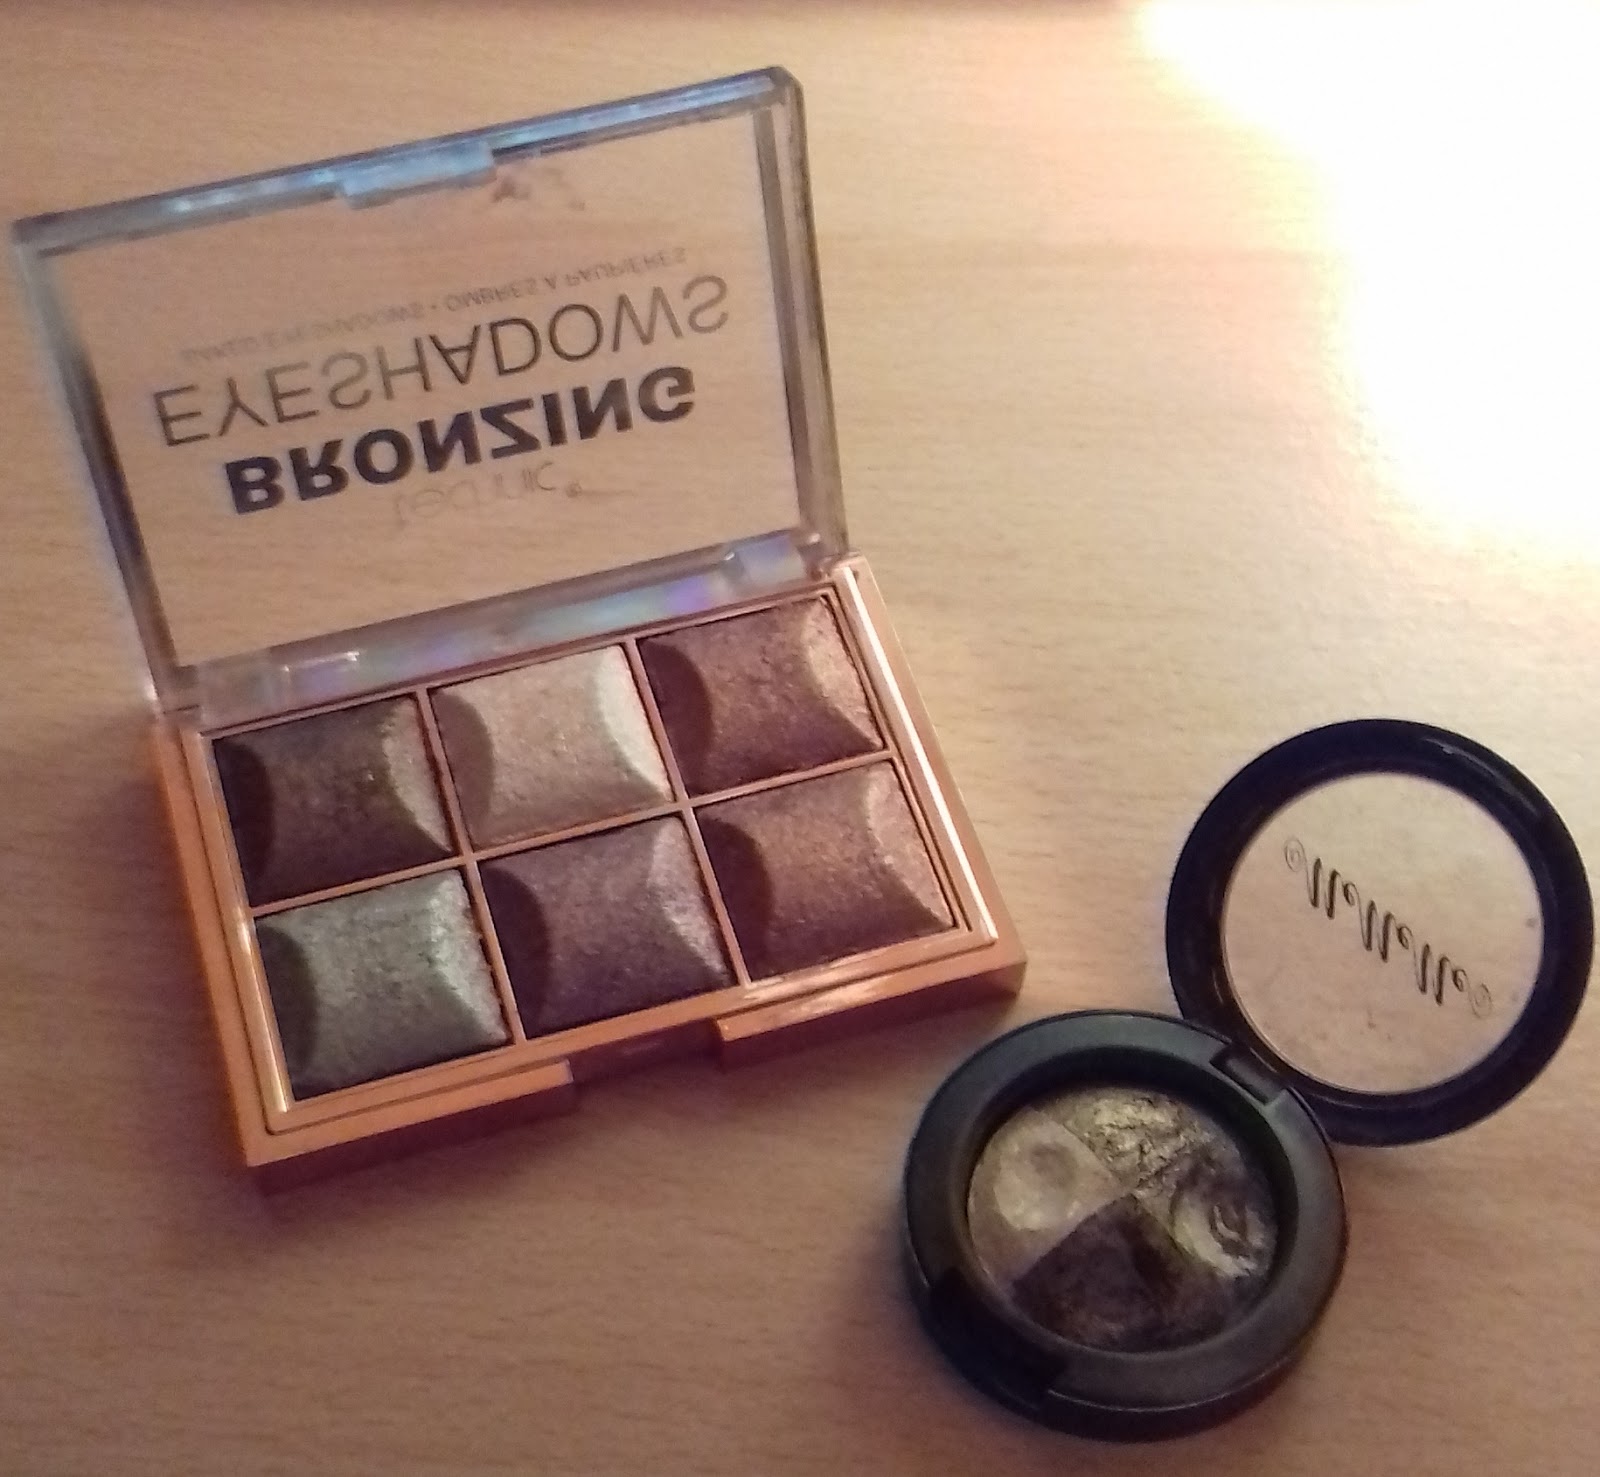
Technic 'Bronzing Eyeshadows Baked Eyeshadow ' in
 'Frosted Rose' and 'Golden Bronze Baked Eye shadow'.
The image is taken in artificial lighting to show the shimmer and
satin effect they create even in a dark, night time environment. 

Hey,


For this post, I thought I would share with all of you my one makeup product that I just can't not get enough of right now: baked eye shadow and the smokey eye look. When it comes to my favourite make up, I don't just mean big brands, oh no, I mean all the brands I have.

Eye shadow is also a great product to use to do your makeup for dance, such as for a dance show using the smokey eye look, as it contours your eyes making them easily visible on stage whilst looking great for a show. I used my 'Golden Bronze Baked Eyeshadow' for the dance show I took part in in June 2016, and the results are great. In the photos taken of me you can see the smokey eye look and my face easily on stage, and the look appears professional too.
Technic 'Bronzing Eyeshadows Baked Eyeshadow 'in
 'Frosted Rose' and 'Golden Bronze Baked Eye shadow'.
The image is taken in natural lighting to show
the shimmer and 
satin effect they create.
 
So for my baked eye shadow, this collection consists of many different brands that I discovered and now adore. If I love a make up product, I don't mind what brand it is, be it cheap or averagely priced, I'm willing to try it out and adopt it as my own; because I love to save money via the best deals and money saving includes trying new brands at more affordable prices.

To  me, baked eye shadow is amazing. I love the look you can achieve with it and the consistency this eye shadow has with its satin-like effect when it catches in the light. Because it's baked, I find it tends to last longer, yet still looks fabulous on your eyes, meaning you can save on topping up your stash. Another great thing I find about baked eye shadow, is that due to this eye shadow being baked, it has more shimmer to it, making the coverage fuller on your eyelids. This in turn allows you to develop your look from pretty to glam, just by adding more baked shadow with the best results via dabbing and pressing the shadow gently onto the lids for a chick look. So let me introduce my most used baked shadows and their looks. I have incorporated images to show their consistency, some taken in the day with natural lighting to highlight the intensity of the pigment and satin-like shimmer, and images taken in artificial lighting to represent their satin effect and pigment in darker environments at night. 
Day: 'Golden Bronze Baked Eye shadow'.
Upper left: 'Copper Gold', upper right: 'Golden
Bronze', lower left: 'Frosted ivory', lower Right:
'Chocolate'.

Baked eye shadow is my ultimate make up crush right now. When I'm getting ready for a night out, such as to a restaurant or occasion, I always turn to is my smokey eye silver look (yes I created the name myself because I think a commonly used look has to have an official name).
 
For the day, my first look I turn to is my most faithful 'Dark Bronze Baked Eye Shadow' set which I adore. This shadow is versatile (like other baked eye shadows) and can be paired with any normal pressed eye shadow, such as when I use my 'Golden Bronze Baked Eye Shadow' with my 'Silver Nude Pressed Shadow' from a long lasting palette of mine. This duo go hand-in-hand to achieve a subtly smokey look for the day, using 'Silver Nude' for the base and 'Golden Bronze' for the crease of the eye. 
Night: 'Golden Bronze Baked Eye shadow'.
Upper left: 'Copper Gold', upper right: 'Golden 
Bronze', lower left: 'Frosted ivory', lower Right: 
'Chocolate'.

   At the night to achieve my second favourite look with these baked shadows, I use the dark smokey look, by adding 'Chocolate' to the look on my outer corner of the eyelid to create depth and make my eyes pop; highlighting my eyes with the 'Silver Nude' whilst giving off a dark smokey look with 'Golden Bronze' and 'Chocolate'. In my post, ðŸŽƒ 🎀 Halloween Look | Broken Porcelain Doll 🎀 🎃 I used these shadows to create my look and illuminate my eyes, which you can see by clicking the link.  

My third favourite look, is a simple coat of my 'Golden Bronze Baked Eye Shadow'. I start on the outside of my eye lid and work my way in, building on the intensity of the shadow, adding more pigment to the crease of the eye and blending the shadow. My favourite part about this look is the way the shimmer in the eye shadow catches the light, highlighting your eyes and giving a soft glow along side the warm pigmentation which compliments my skin tone. An even better fact is that this eye shadow look takes minutes to perfect and just adds a little extra to your make up look. 

Day: Technic 'Bronzing Eyeshadows Baked Eyeshadow'
 palette in 'Frosted Rose' 

Finally, the last baked eye shadow that I will rant about, is my newly discovered 'Bronzing Eyeshadows Baked Eye Shadow' Palette from Technic. This palette was around £2.99 I believe and I came across it when Christmas shopping one day. Being the baked eye shadow addict that I am, especially a bronze coloured eye shadow lover, I snatched it up. I had been looking for a pinkish bronze baked shadow for a long time, so when I came across this palette I couldn't believe my luck. There were so many palettes to choose from, all with lush colours, but in the end I turned to this 'Bronzing Eyeshadows Baked Eye Shadow' palette in what I like to call 'Frosted Rose' because of the shimmer and pinkish undertones which I adore 

 Night: Technic 'Bronzing Eyeshadows
Baked Eyeshadow' palette in 'Frosted Rose'
   The palette consists of six shadows, all as individually gorgeous as one other, and all with a pinkish pigmented undertone to them. A great part is that not only was this brand cost effective, costing just £2.99 for baked bronze eye shadows, but it's against animal testing, unlike top brands such as 'Rimmel' and 'Maybelline'. This may come as an unexpected fact for some, as many people believe 'cheap' or cost- effective make up is of low quality and therefore bad morals; but in this case that stigma is wrong.

I am  ultimately in love with this 'Bronzing Eye Shadows Baked Eye Shadow' palette, even the way it looks is amazing, with the rose-silver pigmentation and effect it presents. When I got this palette home I loved it so much, I even said to myself "Ohh this palette is so bea" when testing a few shadows on my hand 😄  I am so excited to try this new palette, and see what new smokey eye looks I can concoct, and which of these are best suited to specific occasions. It's decided: this palette is a keeper. 
The back of the Technic 'Bronzing Eyeshadows Baked
Eyeshadow' palette. The small heart says 'Against Animal Testing'

So there are a few of my looks along side the baked shadows I use to create my most used looks; including the introduction to my newest ultimate makeup crush, the 'Bronzing Baked Eye Shadow' palette.  
 
   A thing I cannot get over about baked eye shadow, is that it has such an intense shimmer and allows you to create more depth than pressed shadows allow you to. This makes your look appear even more glamorous then it would be if using pressed eye shadow alone, and more chick than usual; a perfect way to make your look unique. 


Thank you for reading,

Yours truly,
Caris 


Monday, 31 October 2016

🎃 🎀 Halloween Look | Broken Porcelain Doll 🎀 🎃

🎃 🎀 Halloween Look | Broken Porcelain Doll 🎀 🎃


The final look: Broken Porcelain Doll

Hey,

During the Halloween period, I can't help but take part in the fun and get creative with Halloween looks. Every year I enjoy the fact that no matter how unusual you look, it's acceptable because it's Halloween and everyone looks extremely different to their normal, human selves. And so I thought I'd share my Halloween look with you. 

This year, I dressed up at work to raise money for the children's charity the NSPCC, which my employer frequently supports all year round, and with the chance to show my creativity, I couldn't help but take part and become a broken Porcelain doll. 
   I just love the idea of a broken Porcelain doll and all its hidden meanings for Halloween. Think of the symbolic representation that's associated with dolls: the notion that they resemble childhood and joy, yet when broken, a doll can convey sense of a loss of freedom and hope a child may feel when their toy is broken. This is the basis for all films with creepy, haunted dolls; they symbolise a loss of childhood, broken dreams and lost joy. An example, Annabelle the possessed doll.... 


Make up used for the look
So with my love for horror films, and my interest in the hidden meanings and symbolic representations, I decided to get creative and become a broken Porcelain Doll for Halloween. The idea sprang to me when I was thinking of a Halloween look, and my idea for the broken Porcelain doll popped into my head. My design is my original idea and was created using just my ordinary things: make-up and my every day clothes. I personally prefer not to use expensive make-up for Halloween looks, as you cannot tell the difference and at Halloween the aim is to look as creepy as possible, even if your lipstick is cheap as you'll only be wearing it for a short period. Plus drawing on myself is a bit of a waste of make-up, so I tend leave big brands out of the picture, except for my everyday makeup which consists of brands such as Maybelline, Rimmel and Soap & Glory because I have no other make-up brands to use.
Silver Nude eye-shadow
     The images are from two occasions, my first practice so I could have time to take the images for you lovely people, and the others are from after I got back from work; as I had to set off at 9 for work so wouldn't of had enough time to take images of my look.


Firstly, for the look, I wore my White Long Sleeved Turtle Neck- my essential top for everything - my Black Dungaree Pinafore Dress and white shoes. I paired myself with an old teddy, that is conveniently broken at the back, to mimic the toys that dolls would come with, and give off a creepier vibe. 

Golden Bronze baked eye shadow
For my makeup, I put on my every day look: foundation, concealer, press powder and mascara. I then used a lot of pink blush for my cheeks to mimic the rosy cheeks dolls have, and smokey eye look to make my eyes pop using my frosted Silver Nude eye shadow, and Golden Bronze and Chocolate baked eye shadow. I followed this with my Avon Matte Lipstick in 'Peach Flatters' (which I have previously blogged about alongside other lipsticks: Favourite Lipstick Picks | Lipsticks I Couldn't Live Without) to achieve the heavy and bright lipstick dolls would have.

Chocolate baked eye shadow
I tied my hair into two messy pig tails, then left my fringe out at the front, to present the often childlike hairstyles that dolls would have. This look can also be with your hair down which I wore for work when I decided to leave my hair down for the day after it fell out. 

The finished look close up: Broken Porcelain Doll
To achieve the cracks on my hand and face, I used my Soap & Glory felt tip eyeliner pen and drew the cracks lightly onto my skin, filling in some parts to make it seem as though I was missing pieces. Soap & Glory is the only brand I own for eye liner, as I find it to be amazing because it doesn't smudge, lasts all day, and the felt tip is perfect for precision of make up. The trick with drawing the cracks is to make them as thin as possible and imagine your drawing what cracks on a delicate window would look like. I drew cracks on my right side of my face reaching from my jaw line to my temple, and a smaller one on my left side of my face by my jawline and cheek bone. I then dusted press powder lightly over the cracks on my face to help set the eye liner, and to gain depth of the cracks on my hand, I used ordinary eye shadows in jet black, grey and then white to go over the harsh black lines to give a blended effect, and complete my look. 🎃 🎀


Thank you for reading and happy Halloween,

Yours truly,
Caris